LLM Transform
The LLM Transform (also known as Custom Node) allows you to create custom data transformations using natural language prompts or Python code. This transformer leverages AI to automatically generate code from your descriptions, or lets you write custom Python code directly for more advanced use cases.
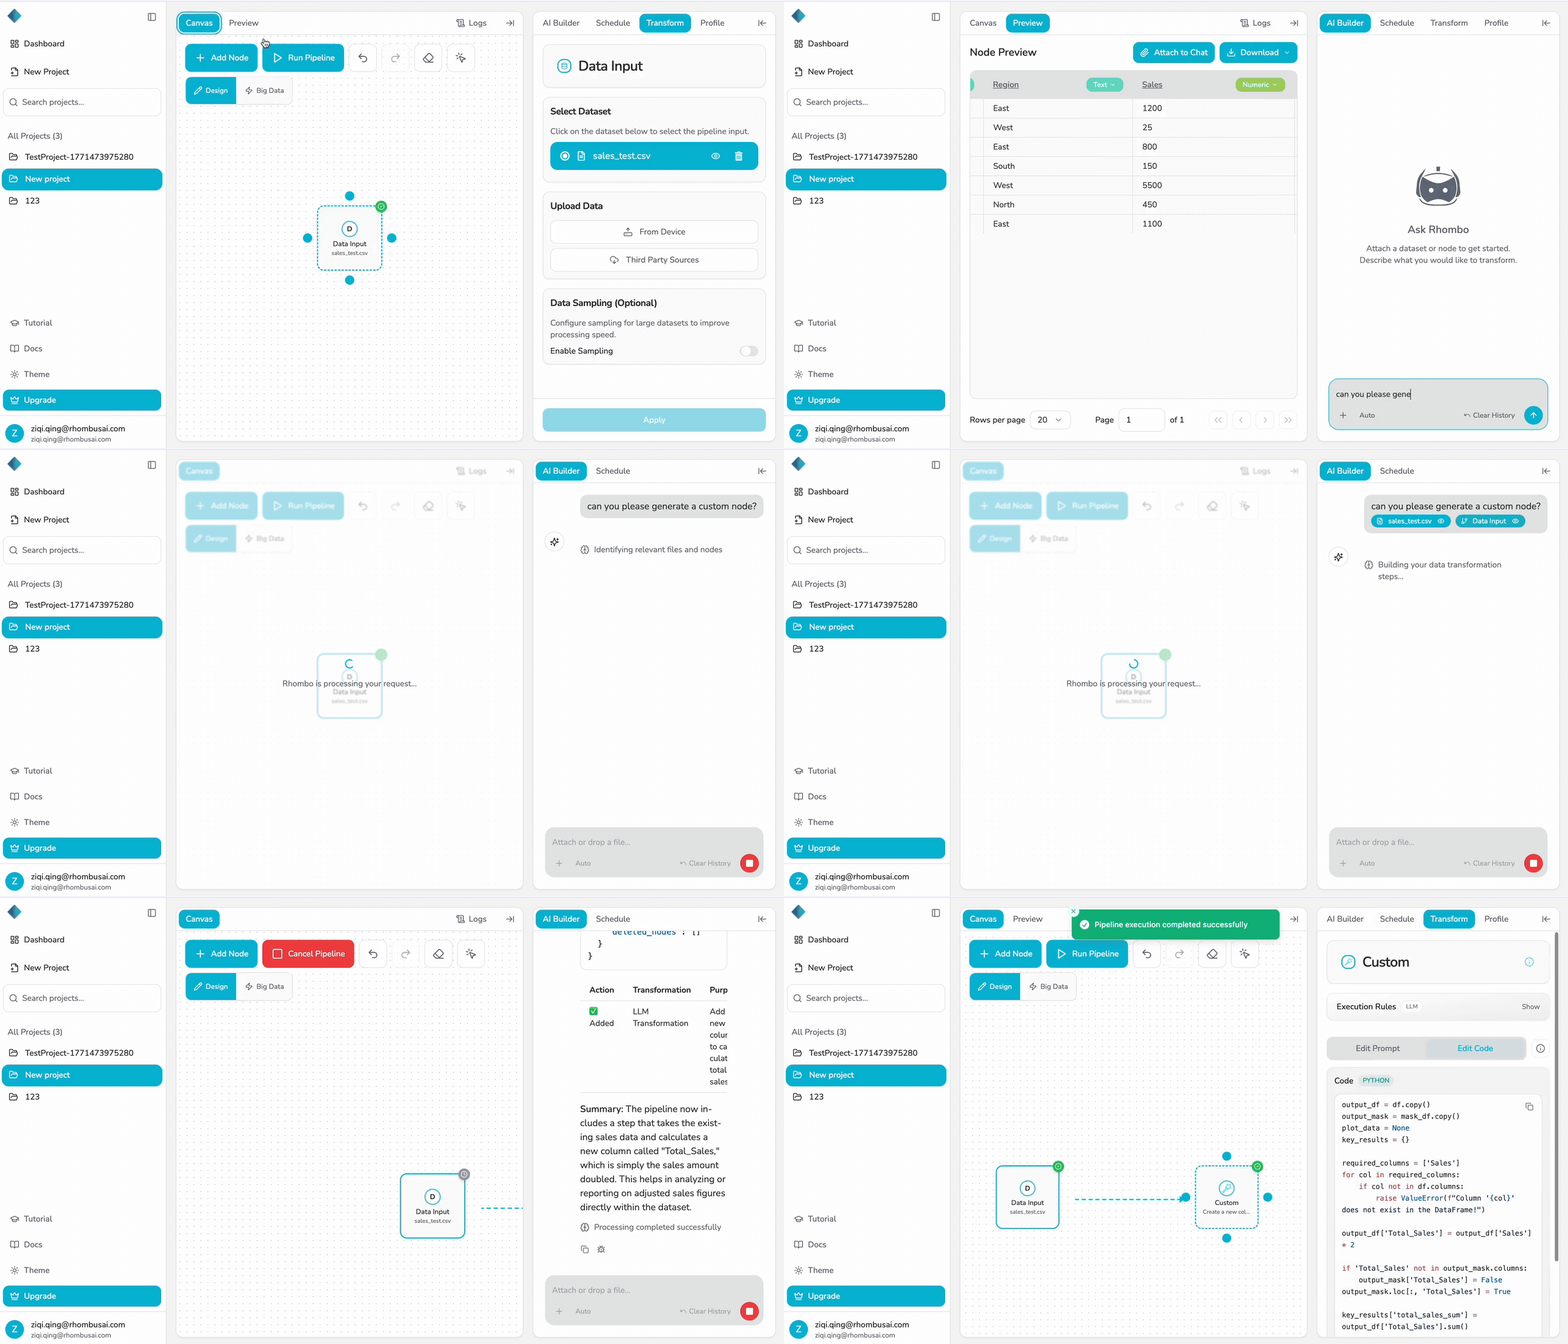
Basic Usage
To create a custom transformation using the LLM Transform:
- Select the LLM Transform from the transform menu.
- Choose your editing mode:
- Edit Prompt: Enter a natural language description of your transformation
- Edit Code: Write or paste Python code directly
- Configure your transformation according to the selected mode.
- Apply the transformation.
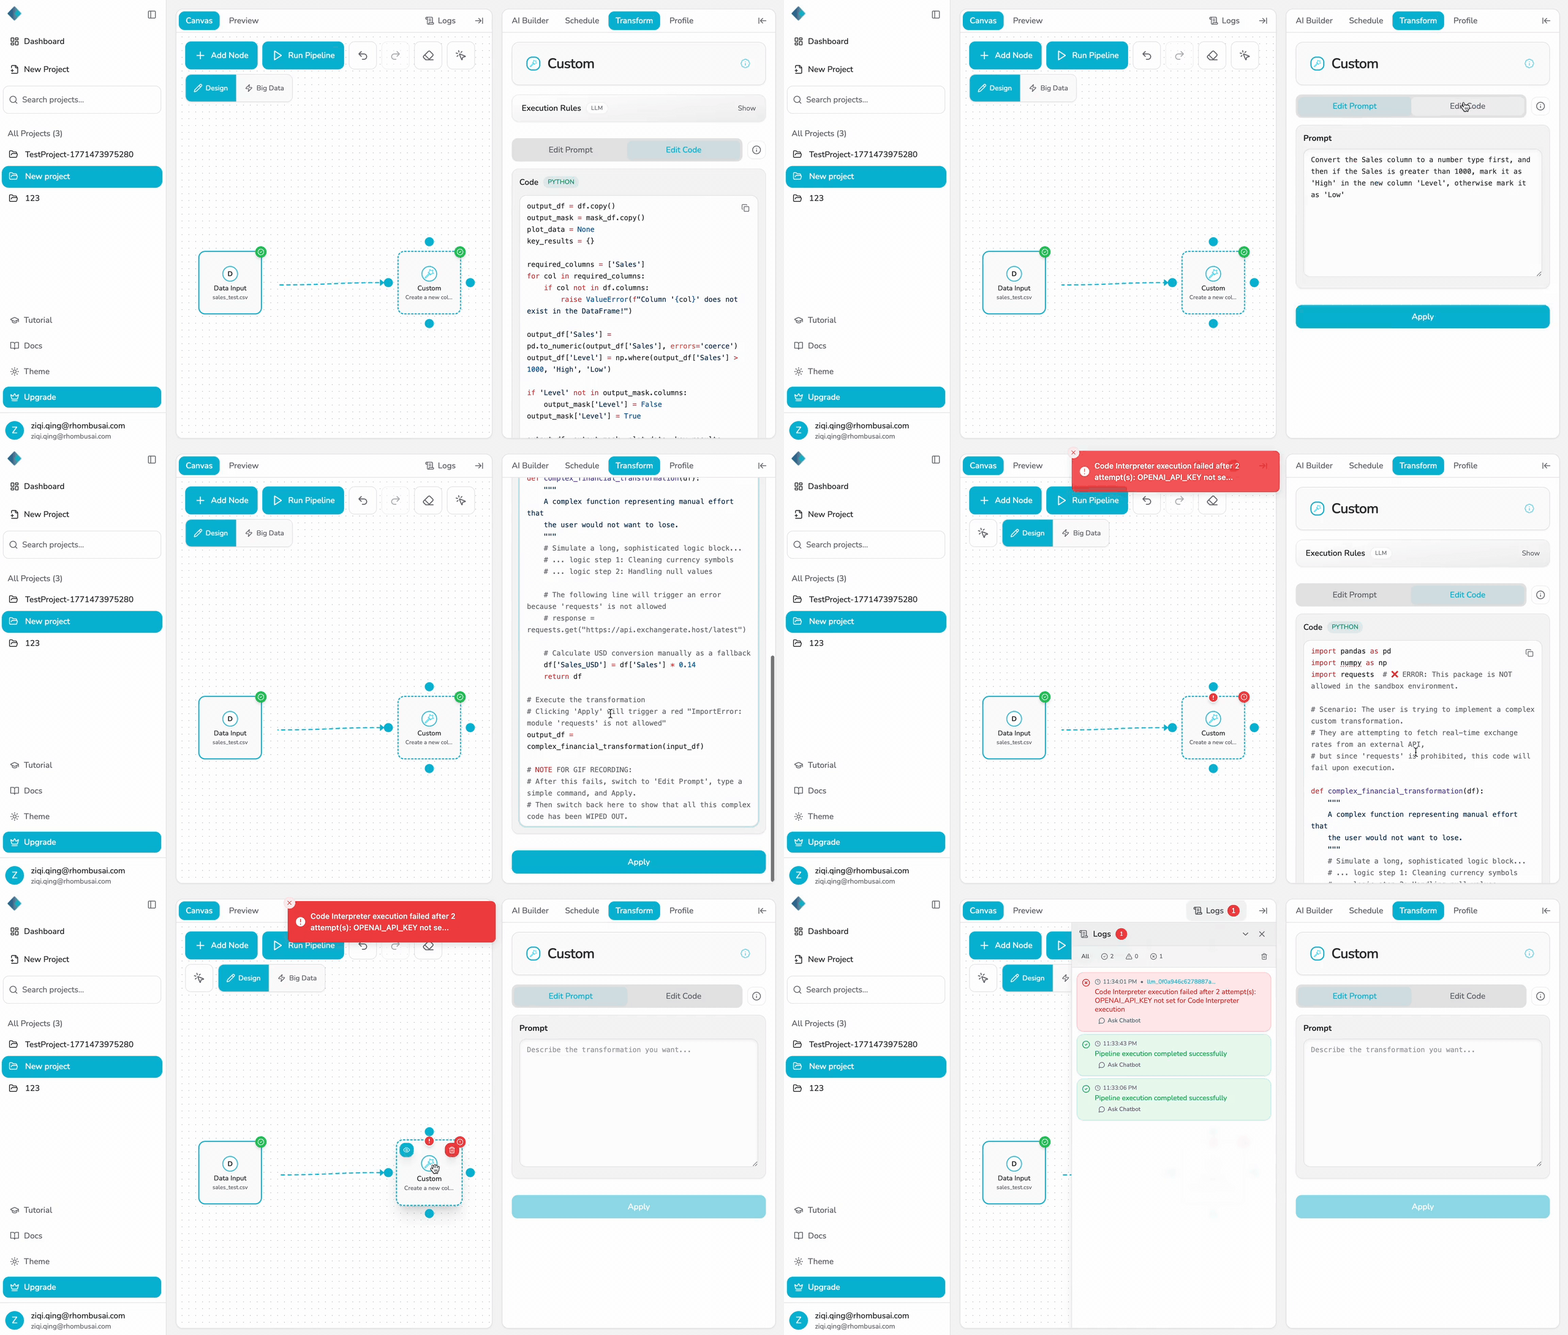
Data Loss Risk: Switching modes and clicking Apply will overwrite the code or prompt in the alternative tab. For example, applying a new Prompt will delete your existing manual Python code. Always back up complex logic before applying changes in a different mode.
The LLM Transform operates in two mutually exclusive modes: Prompt mode (AI-assisted) and Code mode (advanced). When you apply changes in one mode, the other mode is automatically cleared to ensure consistency.
Configuration Options
Basic Options
- Edit Prompt: Enter a natural language description of your transformation. The AI will automatically generate Python code based on your description.
- Edit Code: Write or paste Python code directly for precise control over the transformation logic.
You can switch between Prompt and Code modes at any time. When you apply changes in one mode, the system automatically clears the other mode to prevent conflicts.
Mode Behavior
Prompt Mode (AI-Assisted):
- Enter your transformation intent in natural language
- Click Apply to generate Python code from your prompt
- Direction: Prompt → Code (your prompt becomes the source, system generates and overwrites the Code tab)
- Generated code is automatically synchronized to the Code tab after successful execution
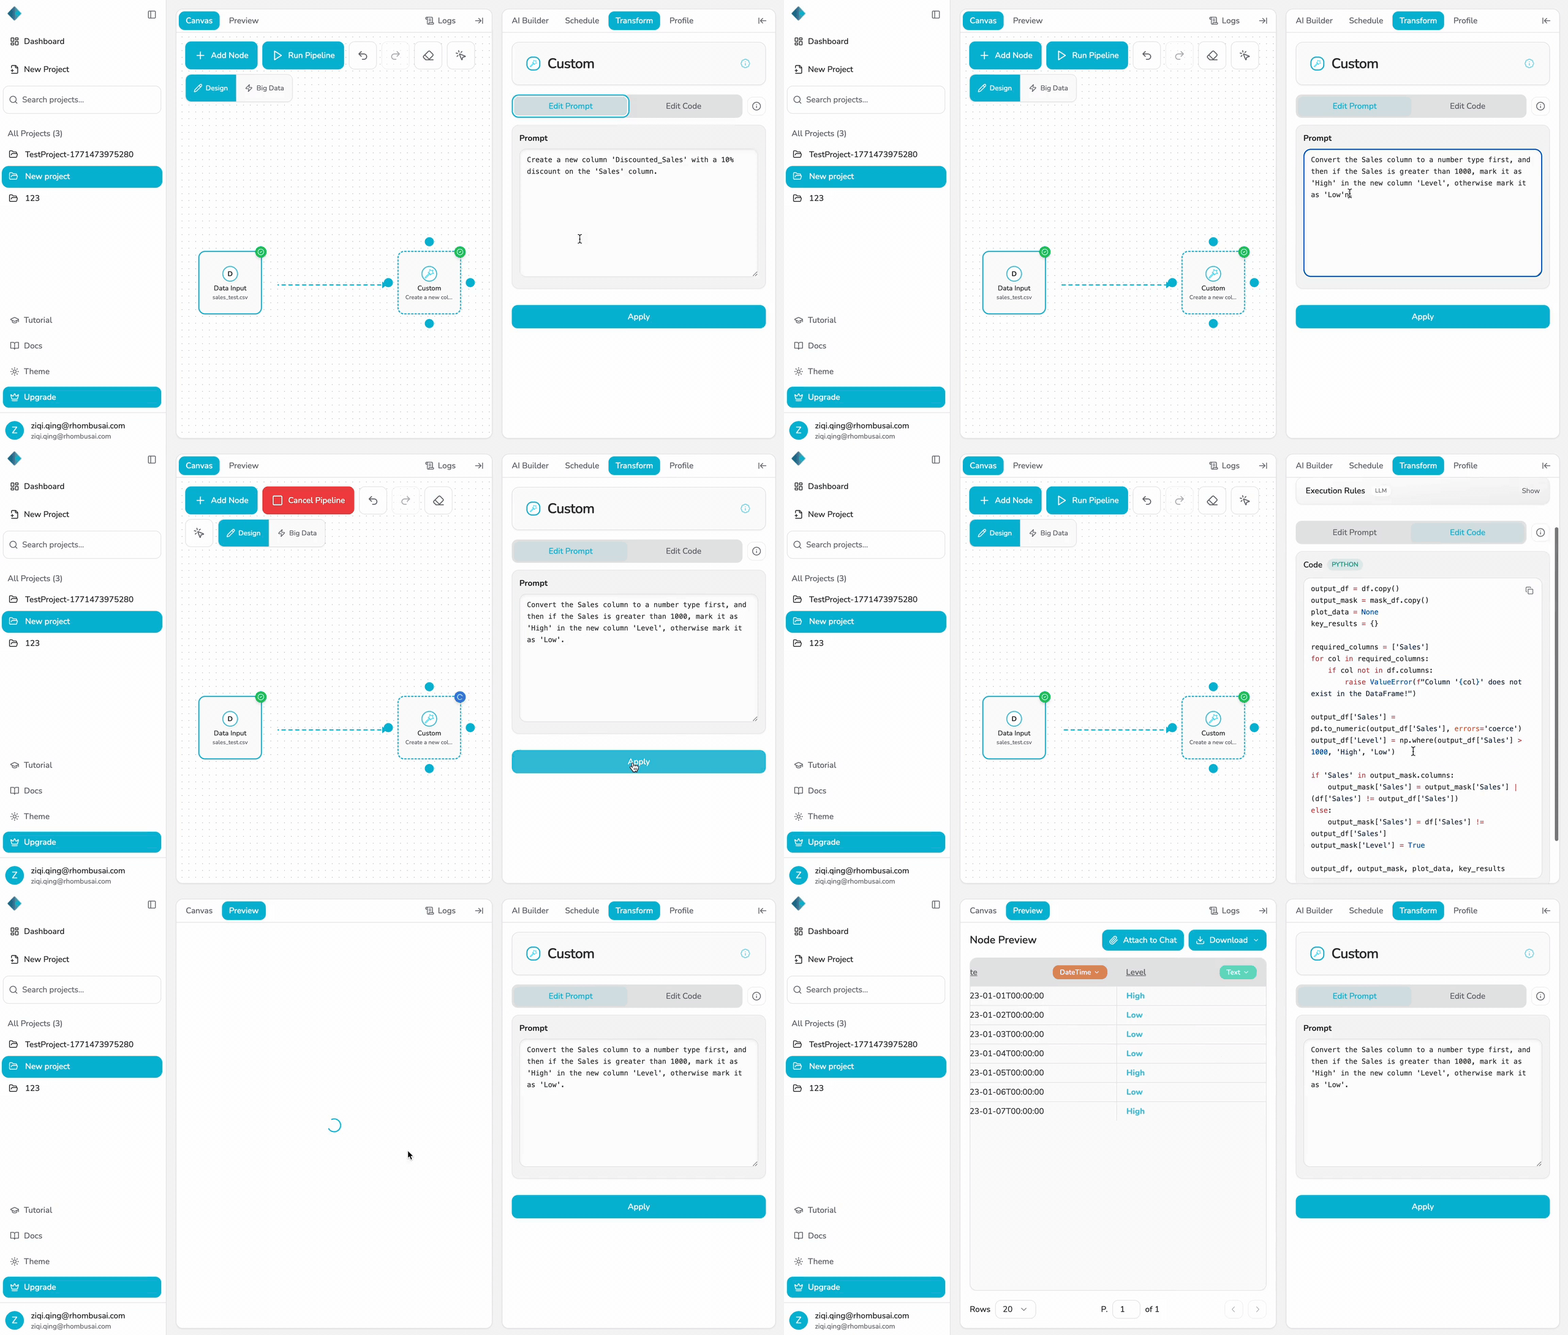
Code Mode (Advanced):
- Write Python code directly
- Click Apply to execute your code
- Direction: Code → Prompt (your code becomes the source, system generates and overwrites the Prompt tab)
- A descriptive prompt is automatically generated and synchronized to the Prompt tab after successful execution
Overwrite Process, Not Merge: When you apply changes, the system overwrites the alternative tab, not merges with it. If Apply fails, the original content in the active tab may still be lost. Always back up important code or prompts before switching modes.
Execution Rules
The LLM Transform operates within a sandboxed environment with specific constraints:
Input Variables:
input_df: The primary input data from the connected parent node (Pandas DataFrame)input_df_2,input_df_3, ...: If multiple nodes are connected, they are injected sequentially asinput_df_2,input_df_3, etc.
The input data from upstream nodes is automatically injected as input_df. If your LLM Transform node has multiple input connections, additional inputs are available as input_df_2, input_df_3, and so on, in the order they are connected.
Allowed Packages: You can only use the following Python libraries:
pandas,numpy,scipy,sklearn,statsmodels,matplotlib,seaborn,plotly,math,datetime,re,collections,itertools,json
If you attempt to import libraries outside this list (such as requests or os), the system will raise an ImportError when you apply the transformation.
Output Requirements: Your code must assign results to one or more of these specific variable names:
-
output_df: The main transformed DataFrame (Pandas DataFrame)- Required type:
pandas.DataFrame
- Required type:
-
output_mask: Mask data for highlighting or filtering- Required type:
pandas.DataFrameornumpy.ndarray(boolean mask)
- Required type:
-
plot_data: Visualization data if your transformation includes charts- Required type:
dict(Plotly JSON schema format) - Example structure:
plot_data = {
    'type': 'bar',  # or 'line', 'scatter', etc.
    'x': [list of x values],
    'y': [list of y values],
    'title': 'Chart Title'
}
- Required type:
-
key_results: Key metrics or statistical summaries- Required type:
dict(flat dictionary of key-value pairs) - Example:
key_results = {
    "accuracy": 0.95,
    "rows_processed": 1200,
    "mean_value": 42.5
} - Note: Nested objects are supported, but flat dictionaries are recommended for better display
- Required type:
If your code doesn't assign results to at least one of these variables, the system cannot identify the transformation output and will fail.
Runtime Environment:
- Python Version: Python 3.9+
- Execution Timeout: Code execution has a timeout limit (typically 30-60 seconds depending on system load)
- Memory Limit: Execution is subject to memory constraints
- Debugging: You can use
print()statements for debugging. Output will appear in the execution logs, which are accessible through the node's error panel or execution history
For debugging, use print() statements to output intermediate values. Check the node's error panel (red indicator at the top) or the execution history to view print output and error messages.
Mode Selection Guide
Prompt Mode (AI-Assisted)
Best for users who want to describe their transformation intent without writing code.
How it works:
- Enter a natural language description of what you want to do
- Click "Apply"
- The AI generates Python code that follows all execution rules
- The generated code is executed and results are displayed
- The generated code appears in the Code tab for review
Example Prompt:
Calculate the average sales per region and create a bar chart showing the results.
Prompt mode automatically ensures that generated code uses only allowed packages and outputs to the correct variables.
Code Mode (Advanced)
Best for users who need precise control or want to modify AI-generated code.
How it works:
- Write or paste Python code directly
- Ensure your code uses only allowed packages
- Ensure your code outputs to the required variables (
output_df, etc.) - Click "Apply"
- Your code runs exactly as written
- A descriptive prompt is automatically generated and appears in the Prompt tab
Editor Features:
- Syntax Highlighting: Code is highlighted using Shiki for better readability
- Auto-indentation: Automatic indentation after colons (
:) and brackets - Tab Support: Standard tab key for indentation
- Code Completion: Basic code completion support
Example Code:
import pandas as pd
import numpy as np

# Calculate average sales per region
avg_sales = input_df.groupby('region')['sales'].mean().reset_index()
avg_sales.columns = ['region', 'avg_sales']

# Create plot data
plot_data = {
    'type': 'bar',
    'x': avg_sales['region'].tolist(),
    'y': avg_sales['avg_sales'].tolist()
}

output_df = avg_sales
In Code mode, the system does not automatically fix or modify your code. You must manually ensure code correctness and compliance with execution rules.
Examples
Here's an example of how to use the LLM Transform:
Example: Data Aggregation with Prompt Mode
Prompt: "Calculate the total revenue by product category and show the top 5 categories"
Configuration:
- Mode: Prompt
- Enter the prompt above and click Apply
Generated Code (simplified):
import pandas as pd

category_revenue = input_df.groupby('category')['revenue'].sum().reset_index()
top_5 = category_revenue.nlargest(5, 'revenue')

output_df = top_5
key_results = {'total_categories': len(category_revenue), 'top_revenue': top_5['revenue'].max()}
Example: Data Cleaning with Code Mode
Input Dataset:
| customer_id | date | amount | status |
|---|---|---|---|
| 1 | 2023-01-01 | 100 | active |
| 1 | 2023-01-02 | 150 | active |
| 2 | 2023-01-01 | 200 | active |
Configuration:
- Mode: Code
- Enter the following code:
import pandas as pd

# Sort by date descending, then drop duplicates keeping first (most recent)
cleaned_df = input_df.sort_values('date', ascending=False)
cleaned_df = cleaned_df.drop_duplicates(subset=['customer_id', 'date'], keep='first')

output_df = cleaned_df
Result:
| customer_id | date | amount | status |
|---|---|---|---|
| 1 | 2023-01-02 | 150 | active |
| 2 | 2023-01-01 | 200 | active |
Best Practices
- Start Simple: Begin with basic prompts and gradually add complexity
- Review Generated Code: Always check the Code tab to understand what AI generated
- Test Incrementally: Test transformations on small datasets before applying to large ones
- Use Descriptive Prompts: The more specific your prompt, the better the generated code
- Leverage Both Modes: Use Prompt mode for ideation, Code mode for refinement
- Follow Output Rules: Always ensure your code outputs to the required variables
- Document Complex Logic: For complex transformations, add comments in Code mode
Troubleshooting
Import Errors
Problem: You get an ImportError when applying code.
Where to see the error: Check the red error indicator at the top of the node, or open the node's configuration panel to view the error message at the bottom.
Solution:
- Check that you're only importing from the allowed packages list
- Remove any imports for packages like
requests,os,sys, etc. - Switch to Prompt mode to let AI generate code that follows the rules
Missing Output Variables
Problem: Transformation runs but produces no output.
Where to see the error: The error will appear in the node's error panel (red indicator at the top) or in the configuration panel.
Solution:
- Ensure your code assigns results to at least one of:
output_df,output_mask,plot_data, orkey_results - Check that variable names are spelled correctly
- Verify that your transformation logic actually produces data
Unexpected Results
Problem: The transformation produces results that don't match your expectations.
Solution:
- Review the generated code in Code mode to understand what was actually executed
- Refine your prompt with more specific details
- Test with a small sample of data first
- Check the input data format and structure
- Use
print()statements to debug intermediate values (check execution logs)
Mode Switching Issues
Problem: Changes in one mode don't reflect in the other mode.
Solution:
- Remember that modes are mutually exclusive — applying in one mode overwrites the other
- Synchronization only occurs after successful execution
- If Apply fails, the original content may still be lost — always back up important code
- Wait for the system to synchronize after execution completes
Execution Timeout
Problem: Code execution times out or fails to complete.
Where to see the error: Timeout errors appear in the node's error panel (red indicator at the top).
Solution:
- Optimize your code for performance
- Break complex transformations into smaller steps
- Reduce dataset size for testing
- Check for infinite loops or inefficient operations
Incorrect Output Format
Problem: Output variables are assigned but results don't display correctly.
Solution:
- For
plot_data: Ensure it follows Plotly JSON schema format - For
key_results: Use flat dictionaries when possible (nested objects may not display optimally) - For
output_df: Ensure it's a valid Pandas DataFrame - Check the error panel for specific format validation errors